The life of automotive enthusiast, mainly revolving around cars and some other vehicles.
maanantai 9. helmikuuta 2015
...and lets see what this does. (Bloglovin)
Follow my blog with Bloglovin
Since it said to post this thing in a new blog post.
Finally back in the garage
So again my plans didn't go as supposed to and at last, yesterday i had time to go to the garage. I took the engine apart and three cylinders had huge carbon deposit. But instead of it being dry and "crunchy" when trying to remove it was more like a paste. And headgaskets just separated apart when i removed them leaving layers on decks in both heads and block. Se definitely something went bad when the engine boiled.

The piston on the left was quite clean, but the one on the right wasn't and you can spot a leakage pattern on bottom in the residue. So i have to scrape the residue off before installing new headgaskets and get the heads checked that they aren't crooked and maybe a light mill.

By the way, get a table on rollers. It makes life so much easyer when you have a good table to work on. And maybe few foldable tables that act just as a stand for tools and placing stuff you have taken off etc. I actually had to use a barrel as a stand for my tool set, but can't complain about that since it worked and i didn't push the whole 166 piece set on ground accidentally. It's a frustrating... no, not just frustrating. It's a pain in the ass if you manage to flip a set on floor, and you're lucky if it actually is a floor instead of dirt. You gotta find every single bit and piece, possibly clean them etc. And losing stuff is quite pricey. 1/4" ratchet and 13mm long socket costed me 50€ combined because i lost them and had to buy new ones. I really, REALLY highly suggest not to lose tools. Especially something as pricey as Kamasa tools are. Always keep your tools cleaned and in order. And some tools like ratchets might even require some maintenance from time to time.

After i had taken the heads apart i started to inspect the spider intake (one with the purple paint) more closely. Paint is easily removable, and that wasn't the problem. But there is a small thing, it isn't plug and play. I have to move the harness from original intake to the spider intake since the harness plugs are different. After that it should be quite straight forward bolt on modification. I have to check that the injectors work on the spider intake. I doubt they are stuck or leaking, but you'll never know since it has been in the shelf for quite some time. But afterall things are looking quite good. The spider intake can be made to look stock and really decent so that it doesn't pop out visually from the engine bay. I still have to order the clutch assembly from Germany. Also today i had a interesting discussion with a friend, and we might have some more projects on the way. But that is for later on and i'll inform if it advances at all, since money is (always) an issue.
Take care, enjoy the ride and drive safe
Hannu
lauantai 31. tammikuuta 2015
Taking the engine out of the Leone


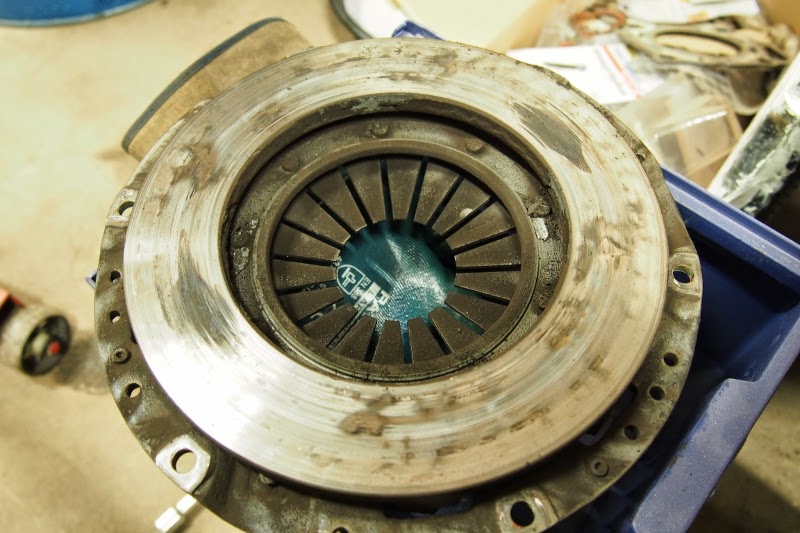
place have started to wear out. Also the pressure plate and flywheel have damaged a bit by the rivets. Now i gotta say, it didn't slip or


It's a good idea to ALWAYS cover your engine when you leave it alone. Especially in a shared space as there can be all sorts of splashes, dust and other not so desirable things happening in same space. You really don't want any excess things in your engine as it could be damaged if you don't clean it up and just start it up later on.

Tomorrow i'm going to go back to the garage to continue on the projects. I have gotten some serious, albeit justified nagging due to the fact that i'm taking up quite a lot of space in the garage. Currently my time and financial side of things aren't really favouring me. Well, hopefully i'll get the white one on the road soon so i can fix up my current daily Ford Fiesta 1.1i Coupe -91 (drivers door is bent and valve clearance is causing some noise) and then sell it to fund my hobbies.
Take care, enjoy the ride and drive safe
Hannu
maanantai 5. tammikuuta 2015
Subaru Leone 1.8 Turbo Wagon
(First i have to apologize for the bad quality of the pictures since i didn't have my camera with me, so i ended up taking pics with the phone)
It has been a while since last post, but i really didn't have anything interesting to post since THIS is the thing i wanted to post next. And there were the holidays and stuff, so no hard feelings. Right?
Around 6 months ago i bought white 1986 Subaru Leone 1.8 Turbo Stationwagon. I actually had one already, but it requires decent amount of work before it's going to pass the local "MOT", known as "Katsastus" in finnish. I guess "Inspection" is close enough word for that. "Nothing major" would include some work with rust and few bushings. But it's not about the green one at this time. This time it's about the first car that i'm genuinely afraid to leave on the street alone. And it was supposed to become my daily... We'll see about that, since i'm planning to fit a alarm to it anyhow. Maybe then i'd get some peace of mind.
.jpg)
It came with those "oh so 80's" Hella square auxillary lights. They can stay on the nose for now, until i come up with better solution. There is possibility to install better auxillary lights, or do better wiring for the cars own lights. I'm probably going to install better auxillary lights AND improve the cars own wiring by doing a relay box that is controlled with the original wiring. That way it can be easily converted back to original state if i (hardly...) or someone else wants to museum inspect it at some point. Oh and reasons for buying another Leone? well...
.jpg)
It has been a while since last post, but i really didn't have anything interesting to post since THIS is the thing i wanted to post next. And there were the holidays and stuff, so no hard feelings. Right?
Around 6 months ago i bought white 1986 Subaru Leone 1.8 Turbo Stationwagon. I actually had one already, but it requires decent amount of work before it's going to pass the local "MOT", known as "Katsastus" in finnish. I guess "Inspection" is close enough word for that. "Nothing major" would include some work with rust and few bushings. But it's not about the green one at this time. This time it's about the first car that i'm genuinely afraid to leave on the street alone. And it was supposed to become my daily... We'll see about that, since i'm planning to fit a alarm to it anyhow. Maybe then i'd get some peace of mind.
It came with those "oh so 80's" Hella square auxillary lights. They can stay on the nose for now, until i come up with better solution. There is possibility to install better auxillary lights, or do better wiring for the cars own lights. I'm probably going to install better auxillary lights AND improve the cars own wiring by doing a relay box that is controlled with the original wiring. That way it can be easily converted back to original state if i (hardly...) or someone else wants to museum inspect it at some point. Oh and reasons for buying another Leone? well...
Does it REALLY need more reasons? All original 84k kilometers on clock. Want more? Always kept in warm garage, hardly never driven in winter. More? Everything works. E-v-e-r-y-t-h-i-n-g. Well... almost. One thing isn't working as supposed but you'll see soon. Even the original air suspension is in working order. Oh and it even has some real, 80's extras!
.jpg) Now this is purely my opinion, but this genuinely 80's Raid aftermarket steering wheel is so awesome. Sure, the rim has some scruff marks because apparently someone has driven it with some serious jewellery on their hands. Or a poodle has eaten the rim. And i'm not kidding about the poodle. The car has a sticker of "Suomen villakoirakerho RY" (Poodle club of Finland) in the rear side window, and 230 volt socket in the boot for heater. The socket gets power from the same line as auxillary engine heater.
Now this is purely my opinion, but this genuinely 80's Raid aftermarket steering wheel is so awesome. Sure, the rim has some scruff marks because apparently someone has driven it with some serious jewellery on their hands. Or a poodle has eaten the rim. And i'm not kidding about the poodle. The car has a sticker of "Suomen villakoirakerho RY" (Poodle club of Finland) in the rear side window, and 230 volt socket in the boot for heater. The socket gets power from the same line as auxillary engine heater.
Now about the one thing that DOENSN'T work. The engine. Well it runs good, but a while back i left the car running on the yard and suddently it boiled. I was alone at the garage in middle of the night and garage doors were wide open. I couldn't leave the yard to go driving and cooling it down so i had to do the thing that is really, really, REALLY no-no. I turned it off while it was boiling hot. I noticed that for some reason the radiator fan didn't work at first, but after a while it started to do it's thing. After a while i checked fluids and drove it home without issues, and on next day back to the garage with a friend following me on other car. At halfway of the trip my friend calls me and gives out the most shittyest laugh in a while, that was followed by this. "There is something weird coming out of your exhaust, like clouds of fog. It's quite white stuff that comes out. OH ANOTHER CLOUD!" and i saw it too from my mirrors. We both started laughing as my friend said "Buy a subaru you said. It's a reliable car you said."
Reason for that specific sentence was that he bought 1st gen Legacy Turbo that appeared to be decent, but has ended up being sort of pain in the ass. And i, sorry human being, recommended that thing for him.
There is only few options for white clouds coming from the exhaust of Subaru Leone that is equipped with EA82T engine. Either head gaskets are blown (hopefully) or exhaust channels in the head have cracked. If the gaskets are blown, it's fairly simple procedure. If the heads have cracked, i have to send them to Aution Auto at Ylivieska. The green Leone got all exhaust channels blown due radiator leakage and they were able to weld them back with no issues at all. I've hear that they have even fixed totally blown Alfa Romeo racing heads. If i have to send the heads i'm gonna take the engine out of the green Leone and drop it in the white one since it's fully functional until i get the heads fixed and swap the engines back like they should be. Aution Auto came highly recommended by Jukka from Subtech.
I already have the full engine gasket set waiting, so i started to remove the engine. I know a guy who can remove the engine of Leone in 1½ hours, but all the things i did today, took about 4 hours in total. I disconnected everything, drained the fluids and took off the radiator because it's easyer to take the engine out when there is no radiator and it needs to be replaced too. It looks good at first but it's really corroded, you can see the blue corrosion coming through the black paint. I found a surprise too.
.jpg)
.jpg)
The thermostat that controls the fan is in really bad condition. It's very corroded, and that black stuff on the plastic isn't dirt or muck. It has been fried electrically. And that red arrow shows a spot where it has even started to fall apart. The connector isn't in better shape either, so i have to install new thermostat and new connector. I bet this is the reason first place why the engine started to boil. Also the water pump seems like original part, so i'm going to change that and i bet the timing belts are original since the mileage isn't full yet so i'll be replacing those too. Good thing with this engine is that it's not interference engine and blown timing belt doesn't cause much damage, if any at all.
Next time i'm going to lift the engine out and take it apart to see the damage. Also what i got in store for getting rid of the heat problems is Air-to-water intercooler from 1st gen. Legacy Turbo and i'm planning to install Spider intake form XT Coupe. So OEM+ and stealth is the way i prefer.
If you'd be interested to see a really awesome Leone, head over to the NASIOC and check out this high quality build! The green one MIGHT just become something like that one day.
Take care, enjoy the ride and drive safe
Hannu
Now about the one thing that DOENSN'T work. The engine. Well it runs good, but a while back i left the car running on the yard and suddently it boiled. I was alone at the garage in middle of the night and garage doors were wide open. I couldn't leave the yard to go driving and cooling it down so i had to do the thing that is really, really, REALLY no-no. I turned it off while it was boiling hot. I noticed that for some reason the radiator fan didn't work at first, but after a while it started to do it's thing. After a while i checked fluids and drove it home without issues, and on next day back to the garage with a friend following me on other car. At halfway of the trip my friend calls me and gives out the most shittyest laugh in a while, that was followed by this. "There is something weird coming out of your exhaust, like clouds of fog. It's quite white stuff that comes out. OH ANOTHER CLOUD!" and i saw it too from my mirrors. We both started laughing as my friend said "Buy a subaru you said. It's a reliable car you said."
Reason for that specific sentence was that he bought 1st gen Legacy Turbo that appeared to be decent, but has ended up being sort of pain in the ass. And i, sorry human being, recommended that thing for him.
There is only few options for white clouds coming from the exhaust of Subaru Leone that is equipped with EA82T engine. Either head gaskets are blown (hopefully) or exhaust channels in the head have cracked. If the gaskets are blown, it's fairly simple procedure. If the heads have cracked, i have to send them to Aution Auto at Ylivieska. The green Leone got all exhaust channels blown due radiator leakage and they were able to weld them back with no issues at all. I've hear that they have even fixed totally blown Alfa Romeo racing heads. If i have to send the heads i'm gonna take the engine out of the green Leone and drop it in the white one since it's fully functional until i get the heads fixed and swap the engines back like they should be. Aution Auto came highly recommended by Jukka from Subtech.
I already have the full engine gasket set waiting, so i started to remove the engine. I know a guy who can remove the engine of Leone in 1½ hours, but all the things i did today, took about 4 hours in total. I disconnected everything, drained the fluids and took off the radiator because it's easyer to take the engine out when there is no radiator and it needs to be replaced too. It looks good at first but it's really corroded, you can see the blue corrosion coming through the black paint. I found a surprise too.
The thermostat that controls the fan is in really bad condition. It's very corroded, and that black stuff on the plastic isn't dirt or muck. It has been fried electrically. And that red arrow shows a spot where it has even started to fall apart. The connector isn't in better shape either, so i have to install new thermostat and new connector. I bet this is the reason first place why the engine started to boil. Also the water pump seems like original part, so i'm going to change that and i bet the timing belts are original since the mileage isn't full yet so i'll be replacing those too. Good thing with this engine is that it's not interference engine and blown timing belt doesn't cause much damage, if any at all.
Next time i'm going to lift the engine out and take it apart to see the damage. Also what i got in store for getting rid of the heat problems is Air-to-water intercooler from 1st gen. Legacy Turbo and i'm planning to install Spider intake form XT Coupe. So OEM+ and stealth is the way i prefer.
If you'd be interested to see a really awesome Leone, head over to the NASIOC and check out this high quality build! The green one MIGHT just become something like that one day.
Take care, enjoy the ride and drive safe
Hannu
sunnuntai 21. joulukuuta 2014
Changing the oils yourself and reasons for doing so

In Picture there is two oil filters, the blue Simota being a used one and black Tokyo Roki made Mazda RX-8 filter being new one.
Service stations can charge you a pretty hefty sums for as simple procedure as it is. Usually in Subarus equipped with gasoline turbo engine the oil change interval is somewhere between 5,000 to 7,500 kilometers. On my wifes -07 Turbo Forester it's 5,000 kilometers. The car gets driven about 50,000 kilometers per year. That's 10 oil changes in a year. My usual choice of oil, oilplug gasket and filter cost around 70-80€ per change. If i'd take it to the shop, they would add 60 to 80€ for the labour and oil disposal costs. My friend told me that the BMW dealership service quoted him for 240€. For a freaking oil change! My VERY strong opinion on that is the next: IT'S A LEGALIZED ROBBERY! And no, it's not an M-series car, just a plain Diesel that uses regular oil.
But there is a catch with the BMW. The oil pan apparently doesn't have a plug for draining so the oil must be pumped out, atleast that's what my friend told me. And because almost no one has the pump in their own driveway, dealership and service stations can charge what ever they like because oil is one of the most vital parts of your cars engine.
If i do my own oil changes the yearly costs for that are around 800€. If i pay for someone to do it, yearly costs will double to around 1600€. Now that is a amount of money i'd hate to see going to waste. Wrap your head around that thought for a second, throwing 800€ away. Now think about the other maintenance you need to do like washing, polishing and hoovering your car. With that sum of money that you pay yearly to service stations for maintenance labour it's more than possible to rent a part of heated garage, possibly with good lift and access to few pricyer tools like welding machines, drill press etc. Or if you have your own garage with the house you're living in, what else can yearly 800€ get?
We have few empty oil barrels that we got for free. If we fill one barrel full of oil, it's usually free to return to a company that regenerates the oil. Unless the oil is too watery, then it'll cost you. And it's even possible to use the old oils in oil or diesel powered heater when you mix it with proper fuel for the specific heater. It might not be legal depending where you live but it's possible.
Because every car has their own places for everything, this is more of a general guideline rather that specific how-to.
You'll definatelty need good oil resistant gloves since it's preferrable to change the oil while it's hot, or atleast warm because it runs better that way. I have used double gloves. Some normal thin working gloves under and nitrile coated ones over them to prevent the hot oil getting to my skin. And by hot i mean it. Oil can be over 100c (usually it's cooler in the pan, but still quite warm) so it's possible to burn your skin if you go in with bare hands. Also some engine parts might be really hot.
Then few tools:
-Spanner for oil drain plug (some cars require hex bits or some other bits for the oil drain plug)
-A dish or bucket where you drop the old oil. Pick a decently sized one because there can be quite lot of oil in the engine. Look in the owners manual for the expected amount of motor oil
-Rags, cleaning cloth or something like that
-Possibly a oil filter cup or something similiar for opening the oil filter
-Possiby some screwdrivers for removing the possible underside plastic under the car that hides the oil plug and possibly the filter.
Investigate where your oil filter is located from owners or service manual, dealership, car service or internet is are good places to find info if you don't want to go searching blindly around the engine bay. Even http://www.bobistheoilguy.com/ might have the info.
Drive the car on the ramps, jack it up or position it on the car lift. Pull the dipstick out a bit so that air can travel through the hole, if you have one. Not all engines have dipsticks these days. Open the oil filler cap so that the air can travel through that hole too. Lift the car if you're on a lift or crawl under the car and remove protective plastics that are usually held in place with plastic body panel studs (yes, the notorious studs, get few spares just in case). Position the dish or bucket under the oil drain plug so that when it opens all the oil goes in to the container of your choice. If you do this on cold engine and the filter is under the on on the side of the engine, take a cup of coffee since it takes few minutes to drain. Unless you got a second dish that you can place under the filter while removing it.
If your filter is on top of the engine, leave the dish under the oil drain and remove the oil filter if you have the oldschool metallic, or open the cap if you're on newer car that has oil filter cup and you only change the filter itself (media). This will let the oil channels breathe even more, so there might come out some more oil from the drain plug.
Clean the surfaces that the sealings of the filter are going to get pressed against. Avoid dropping dirt in to the system as it damages the bearings.
Get the new oil filter and moisturise the rubber seals with new engine oils. This prevents them from burning against the metal. Use a finger to spread the oil evenly on the seal and screw the new filter back to the engine. Now keep in mind, it's not ment to be tightended with any kind of tool. Just bare hand. Exept if you have the plastic can type. I've seen "25Nm MAX" reading on one plastic cover, if i remember correctly it was Volkswagen.
Put the oil drain plug back with new plug gasket and tighten it properly, but do not over-torque it. Otherwise you'll end up buying a new oil pan if the old one cannot be fixed and even fixing the old pan is going to cost some money fi you don't have the tools.
When you have fitted the plug and new filter it's time to fill the engine with new oil. Now it's not necessary to have some sort of funnel, but it's going to make it so much easyer and cleaner. I made my funnel out of plastic bottle that just so happens to screw on to the existing place of oil filler cap.

Once you have filled the engine with proper amount of oil (Check from the owners manual), put the dipstick and oil filler cap back in place and turn the engine on. Let the engine run for few minutes and look if your oil drain plug or filter leaks. If not, shut the engine, but everything back in place and you're done.
My oil change takes about 30 minutes from drive in to drive out. If i'd have carlift, it'd be done in 15 minutes because ol change is a routine for me these days. First time with new car it might take a bit longer.
It's recommended to have a friend along who knows what they're doing for the first time you do this to help you out even though it's not that hard. Actually every time you go under the car that is on jackstands or lift, it's highly recommnded to have some company in case something bad happens.
If you got comments about anything, feel free to post and i'll respond to my best knowledge.
Take care, enjoy the ride and drive safe
Hannu
maanantai 15. joulukuuta 2014
Changing the ballasts of Subaru Forester SG9 -07 (and fitting DIY mudflaps)
So, a while ago other of the xenon bulbs in my wifes Forester died. Nothing dramatic about that since they are parts that wear out. I ordered two Philips Xtreme Visions from eBay and changed the bulbs when they arrived. First they worked great but after a while other one started to "wave" and blink. Eventually it got to a point when it blinks a while until the it goes out. Apparently the ballast has some sort of protection system that causes it to shut down?
Now i have to admit that when i got the bulbs, they weren't in their proper places inside the cardboard box. See, i ordered the service packed version instead of those fancy plastic retail boxes. One of the reasons being that they were cheaper that way, and other being the fact that i absolutely hate this modern culture of disposable stuff. For exaple a plastic fancy package for lightbulbs that has no other use what so ever. And since cardboard can be used as a template, fuel for fire, paper for "homebrew schematics" etc. i preferred them that way. No, i'm not your over-psyched eco-friendly nutjob. You could say i'm selectively cheap/stingy as i prefer to pay for quality over quantity. For example my gaming PC is 6 years old now, and runs even new games pretty ok. Costed a "fortune" when i bought it. I bought the big Kamasa Tools ratchet set because i'm not going to spend money buying new sockets, spanners and ratchet wrenches every year because the cheap ones usually break apart and destroy the corners on the bolts. That set should last my lifetime when properly used and maintained. Well maybe not, but pretty close.
As it happens to be, on the other side you can quite easily access the xenon bulb. Just unscrew one 10mm bolt that holds the plastic cover over the power steering reservoir. Then you can flip the cover open that conseals the bulb and the igniter. But on the drivers side there's a bigger job to do. The car battery. You have to remove the whole thing before you can get to the bulb unless you have removed the front bumber. So i was quite reluctant to swap the bulbs from side to side (wich would have probably been a really, really, REALLY good idea after all as you'll soon find out). Lucky for me, few days after the light started to go out a fellow Subaru driver was selling a pair of ballasts with igniters, only 90k kilometer driven. If even that because they seem to be quite fresh so i bought the pair.
So today i went to the garage and started to wonder how am i going to get the lights off. After few (not so intensive) investigative minutes things got suddently really intensive. Actually so intensive that i cursed for a while. Apparently on pre-facelift model you can remove the housings easily, no exess things to take apart. But on facelifted version you're looking for decent amount of work since you have to take the front bumber off. Now, anyone who has done these things (fiddling with vehicles) knows that when you need to take a big body panel off, it usually means that you're in atleast for good few hours with that panel alone for the first time and then the main repair to top it off.
When you're doing any work that relates to electricity, remember to unconnect the power source (battery). Unless you need electricity for diagnosing the problem, then connect the electricity only to diagnose. Otherwise you might end up wondering where does that funny smell come from and result in some burnt electronics.
So quite carefully i started to take off the plastic body panel studs. If you haven't taken a bodypanel off before, hear this warning. You are bound to break few studs. Maybe few exeptions here and there but usually they have so much dirt and muck and have possibly had some roadsalt during winter and UV light during summer that they are prone to crack. So BEFORE you start taking the whole thing apart, take one off as a sample and head to the local car parts store to find correct ones. And don't be shy, take a bag or two as they don't wear out in your shelf waiting for any another project. You might even need to replace every single one with a new one if they're really prone to breaking. I didn't count but there was something between 20 to 30 studs holding the bumber when i looked in the parts bucket after taking the bumber off.

I don't know if standard halogen versions have headlight washers, but xenons do. You have to take the washer nozzles off before you can take the bumber off as the body of the washer is bolted to a metal frame that's bolted to the bottom of the light housing. I gently pryed a small flat screwdriver under the washer cover. I didn't find anything more suitable, but if possible use a string or fishing line since they are softer materials and won't damage the paint. I pulled the washer out as much as i could. Notice that these washers work by hydraulic pressure (not all of them do, depending on the model and marque so check from service/internet before you act). Atleast that's what i deducted since they have spring that pulls them back inside and they hardly resisted when i pulled them out. The plastic cover is attached to the nozzle, and nozzle is attached to the body with two clips. Gently pry the clips open (Small flat screwdriver works here). And when i say gently, i mean it. The clips look really easy to crack and break. After i got the nozzle off i let the washer back in slowly. Then i took off the studs (and didn't break a single one. It's a miracle) and took off the bumber. Well, almost took it off, i left it attached to underbody panels on drivers side. And after the picture i placed thick plank of packaging cardboad since it's really not ideal at all to keep painted surface against concrete (this is turning out not to be my brightest days now that i think of it).
Then i got to the light housing. The housing and the washer comes off as a single package from the car. After removing them from the car you can separate them so you'll only need to handle the housing. I've circled the 3 bolts (Right side housing) that come off and a one plastic stud that i released from behind the panel. Those are the only things you need to take off to get the package off. If you open the bolts that keep the brace attached and pull the light off, you'll probably end up breaking the plastic pins that align the light and the metal brace.


In the right picture i have already removed the light once and separated the metal bracket
I pulled the light off, separated the metal bracket and the housing and after that i pulled of the electrical plugs. I used a small flat screwdriver as help to press the clips on the plugs open. Then i flipped the light over and got to the ballast.

From here on it's a matter of opening the cap that hides the igniter and the bulb, pulling off the electric connector outside the ballast, unscrewing the three screws that hold the ballast and taking it off, opening the screw that holds the igniter wiring in the ballast, disconnecting igniter from ballast, twisting the igniter off the bulb and gently pulling the igniter out from the cap hole. Put the new ballast and igniter back reversing the steps.
Results? Well... errrrrrr... Success? After changing the first ballast i tried the lights and the flickering was gone for few seconds. Then it came back, but the light didn't go out. So i took out the other housing too and swapped bulbs from side to side. The result was that the flickering chaged side too and the light died with the old ballast. So hooray for (what ever you like) and exess labour. I changed the other ballast too and the bulbs back like they used to be as the flickering one was on the right side where it's easily replaceable.
Minor extra: Mudflaps
I was pretty horrified for the fact that my wife drives daily on gravel roads and the spray of stones and sand from the tyres hitting the car body. So i decided to do my own mudflaps. You COULD save some time, spend some money and buy model specific pre-made ones. But where's the fun in that?
So i bought a 100cm*60cm roll of rubber for less than 30€ (probably nitrile, only specification was "mudflap rubber" and it's quite flexible). I made the sablons out of cardboard box that is used to package frozen pizzas. I bought some body panel studs from local car parts store since there was factory made holes for mudflaps in the arches.
As i opended the front arches for installation i removed a pile of clay and sand from passangers side. I made the sablons weeks ago on the drivers side so i had removed the clay and sand on that side back then. Even though the cars are quite well protected against rust it would still be idiotic to leave any exess moist dirt behind the panels.
 On the picture you can see where i found the dirt at the front of the car. There must have been about 1kg of really packed clay and sand per side.
After cleaning up i made the flaps to front and back and installed them.Only decent shots i got were from behind.

The right side flap looks shorter than the left because the rubber was sold as a roll. It should straighten down quite soon. There is about 5,5cm clearance between the flaps and the ground. They're quite long but if driver takes care with reversing and doesn't jam them between the tyre and some obstacle they'll be fine.

As you can see from the pictures, there is some snow on the ground. Finally. I've been wating so long for snow and ice.
Take care, enjoy the ride and drive safe
Hannu
Now i have to admit that when i got the bulbs, they weren't in their proper places inside the cardboard box. See, i ordered the service packed version instead of those fancy plastic retail boxes. One of the reasons being that they were cheaper that way, and other being the fact that i absolutely hate this modern culture of disposable stuff. For exaple a plastic fancy package for lightbulbs that has no other use what so ever. And since cardboard can be used as a template, fuel for fire, paper for "homebrew schematics" etc. i preferred them that way. No, i'm not your over-psyched eco-friendly nutjob. You could say i'm selectively cheap/stingy as i prefer to pay for quality over quantity. For example my gaming PC is 6 years old now, and runs even new games pretty ok. Costed a "fortune" when i bought it. I bought the big Kamasa Tools ratchet set because i'm not going to spend money buying new sockets, spanners and ratchet wrenches every year because the cheap ones usually break apart and destroy the corners on the bolts. That set should last my lifetime when properly used and maintained. Well maybe not, but pretty close.
As it happens to be, on the other side you can quite easily access the xenon bulb. Just unscrew one 10mm bolt that holds the plastic cover over the power steering reservoir. Then you can flip the cover open that conseals the bulb and the igniter. But on the drivers side there's a bigger job to do. The car battery. You have to remove the whole thing before you can get to the bulb unless you have removed the front bumber. So i was quite reluctant to swap the bulbs from side to side (wich would have probably been a really, really, REALLY good idea after all as you'll soon find out). Lucky for me, few days after the light started to go out a fellow Subaru driver was selling a pair of ballasts with igniters, only 90k kilometer driven. If even that because they seem to be quite fresh so i bought the pair.
So today i went to the garage and started to wonder how am i going to get the lights off. After few (not so intensive) investigative minutes things got suddently really intensive. Actually so intensive that i cursed for a while. Apparently on pre-facelift model you can remove the housings easily, no exess things to take apart. But on facelifted version you're looking for decent amount of work since you have to take the front bumber off. Now, anyone who has done these things (fiddling with vehicles) knows that when you need to take a big body panel off, it usually means that you're in atleast for good few hours with that panel alone for the first time and then the main repair to top it off.
When you're doing any work that relates to electricity, remember to unconnect the power source (battery). Unless you need electricity for diagnosing the problem, then connect the electricity only to diagnose. Otherwise you might end up wondering where does that funny smell come from and result in some burnt electronics.
So quite carefully i started to take off the plastic body panel studs. If you haven't taken a bodypanel off before, hear this warning. You are bound to break few studs. Maybe few exeptions here and there but usually they have so much dirt and muck and have possibly had some roadsalt during winter and UV light during summer that they are prone to crack. So BEFORE you start taking the whole thing apart, take one off as a sample and head to the local car parts store to find correct ones. And don't be shy, take a bag or two as they don't wear out in your shelf waiting for any another project. You might even need to replace every single one with a new one if they're really prone to breaking. I didn't count but there was something between 20 to 30 studs holding the bumber when i looked in the parts bucket after taking the bumber off.
I don't know if standard halogen versions have headlight washers, but xenons do. You have to take the washer nozzles off before you can take the bumber off as the body of the washer is bolted to a metal frame that's bolted to the bottom of the light housing. I gently pryed a small flat screwdriver under the washer cover. I didn't find anything more suitable, but if possible use a string or fishing line since they are softer materials and won't damage the paint. I pulled the washer out as much as i could. Notice that these washers work by hydraulic pressure (not all of them do, depending on the model and marque so check from service/internet before you act). Atleast that's what i deducted since they have spring that pulls them back inside and they hardly resisted when i pulled them out. The plastic cover is attached to the nozzle, and nozzle is attached to the body with two clips. Gently pry the clips open (Small flat screwdriver works here). And when i say gently, i mean it. The clips look really easy to crack and break. After i got the nozzle off i let the washer back in slowly. Then i took off the studs (and didn't break a single one. It's a miracle) and took off the bumber. Well, almost took it off, i left it attached to underbody panels on drivers side. And after the picture i placed thick plank of packaging cardboad since it's really not ideal at all to keep painted surface against concrete (this is turning out not to be my brightest days now that i think of it).
Then i got to the light housing. The housing and the washer comes off as a single package from the car. After removing them from the car you can separate them so you'll only need to handle the housing. I've circled the 3 bolts (Right side housing) that come off and a one plastic stud that i released from behind the panel. Those are the only things you need to take off to get the package off. If you open the bolts that keep the brace attached and pull the light off, you'll probably end up breaking the plastic pins that align the light and the metal brace.
In the right picture i have already removed the light once and separated the metal bracket
I pulled the light off, separated the metal bracket and the housing and after that i pulled of the electrical plugs. I used a small flat screwdriver as help to press the clips on the plugs open. Then i flipped the light over and got to the ballast.
From here on it's a matter of opening the cap that hides the igniter and the bulb, pulling off the electric connector outside the ballast, unscrewing the three screws that hold the ballast and taking it off, opening the screw that holds the igniter wiring in the ballast, disconnecting igniter from ballast, twisting the igniter off the bulb and gently pulling the igniter out from the cap hole. Put the new ballast and igniter back reversing the steps.
Results? Well... errrrrrr... Success? After changing the first ballast i tried the lights and the flickering was gone for few seconds. Then it came back, but the light didn't go out. So i took out the other housing too and swapped bulbs from side to side. The result was that the flickering chaged side too and the light died with the old ballast. So hooray for (what ever you like) and exess labour. I changed the other ballast too and the bulbs back like they used to be as the flickering one was on the right side where it's easily replaceable.
Minor extra: Mudflaps
I was pretty horrified for the fact that my wife drives daily on gravel roads and the spray of stones and sand from the tyres hitting the car body. So i decided to do my own mudflaps. You COULD save some time, spend some money and buy model specific pre-made ones. But where's the fun in that?
So i bought a 100cm*60cm roll of rubber for less than 30€ (probably nitrile, only specification was "mudflap rubber" and it's quite flexible). I made the sablons out of cardboard box that is used to package frozen pizzas. I bought some body panel studs from local car parts store since there was factory made holes for mudflaps in the arches.
As i opended the front arches for installation i removed a pile of clay and sand from passangers side. I made the sablons weeks ago on the drivers side so i had removed the clay and sand on that side back then. Even though the cars are quite well protected against rust it would still be idiotic to leave any exess moist dirt behind the panels.
After cleaning up i made the flaps to front and back and installed them.Only decent shots i got were from behind.
As you can see from the pictures, there is some snow on the ground. Finally. I've been wating so long for snow and ice.
Take care, enjoy the ride and drive safe
Hannu
sunnuntai 14. joulukuuta 2014
When it all began...
Hi
There are only few reasons for me to start this blog. I want to share the how-to knowledge, some ideas i have and i want to have constant practice on my english. Of course it would be awesome if someone would say at some point that i inspired them to take on a project and it was succesful.
I have thought about making this blog for few years, but it seemed pretty pointless before since i didn't have a garage where to do everything or anything. But that has changed now since i rented a garage with some friends. It's warm and can hold up from 3 to 6 cars depending on size (3 80's yanks or 6 early 80's hatchback Civics). As necessary luxury there is a toilet and a break room equipped with coffee machine and PC. The only reason we have the PC at the garage is troubleshooting. It's not that fast, definitely not valuable at all (constructed from scrap parts), but it's worth more than gold when it comes for troubleshooting and looking for parts especially in the middle of the night. So much better that flicking the tiny screen of your phone with your greasy fingers.
By no means am i a professional mechanic. I'm fully home grown mechanic. I actually drive trucks for living. Scanias and such. Driving is my passion, and has been for all my life. From the first matchbox toy car as a child to this very day my life revolves around cars and driving. It's what makes me happy.
(This text has been a draft for quite a while... So let's start because i got first few things)
Hannu
Tilaa:
Blogitekstit (Atom)